
Web scraping với thư viện Python API Google SERP
Để làm việc với thư viện này, bạn cần một API key, cái bạn có thể tìm thấy trong tài khoản website của bạn. Nên,
để tạo rich Google SERP scraper, hãy sử dụng thư viện này:
from google_serp_api import ScrapeitCloudClient
Cũng hãy kết nối thư viện json tích hợp để xử lí trả lời, cái đi đến trong hình thức JSON:
import json
Hãy chỉ ra API key và thiết lập các tham số:
client = ScrapeitCloudClient(api_key=’YOUR-API-KEY’)
response = client.scrape(params={
“q”: search_key,
“location”: “Austin, Texas, United States”,
“domain”: “google.com”,
“deviceType”: “desktop”,
“num”: 100}
)
Bạn có thể thiết lập keyword tìm kiếm, quốc gia bạn muốn nhận dữ liệu từ, số các kết quả sẽ được scrape, và tên
miền Google. Nếu bạn thực thi code, nó sẽ trả về một trả lời hình thức JSON với dữ liệu trong view sau:
– requestMetadata (request metadata)
– id (request ID)
– googleUrl (Google search URL)
– googleHtmlFile (URL of the Google HTML file)
– status (request status)– organicResults (organic results)
– position (result position)
– title (result title)
– link (result link)
– displayedLink (displayed result link)
– source (result source)
– snippet (result snippet)
– snippetHighlitedWords (highlighted words in the result snippet)
– sitelinks (site links embedded in the result)– localResults (local results)
– places (places)
– position (place position)
– title (place title)
– rating (place rating)
– reviews (number of reviews for the place)
– reviewsOriginal (original format of the number of reviews for the place)
– price (place price)
– address (place address)
– hours (place hours of operation)
– serviceOptions (service options)
– placeId (place ID)
– description (place description)– moreLocationsLink (link to more locations)
– relatedSearches (related searches)
– query (related query)
– link (link to related search results)– relatedQuestions (related questions)
– question (related question)
– snippet (snippet of the answer to the related question)
– link (link to related question results)
– title (title of the related question result)
– displayedLink (displayed link of the related question result)– pagination (pagination)
– next (link to the next page of results)
– knowledgeGraph (knowledge graph)
– title (title)
– type (type)
– description (description)
– source (source)– link (source link)
– name (source name)– peopleAlsoSearchFor (people also search for)
– name (name)
– link (link to related search results)– searchInformation (search information)
– totalResults (total number of results)
– timeTaken (time taken for the request)
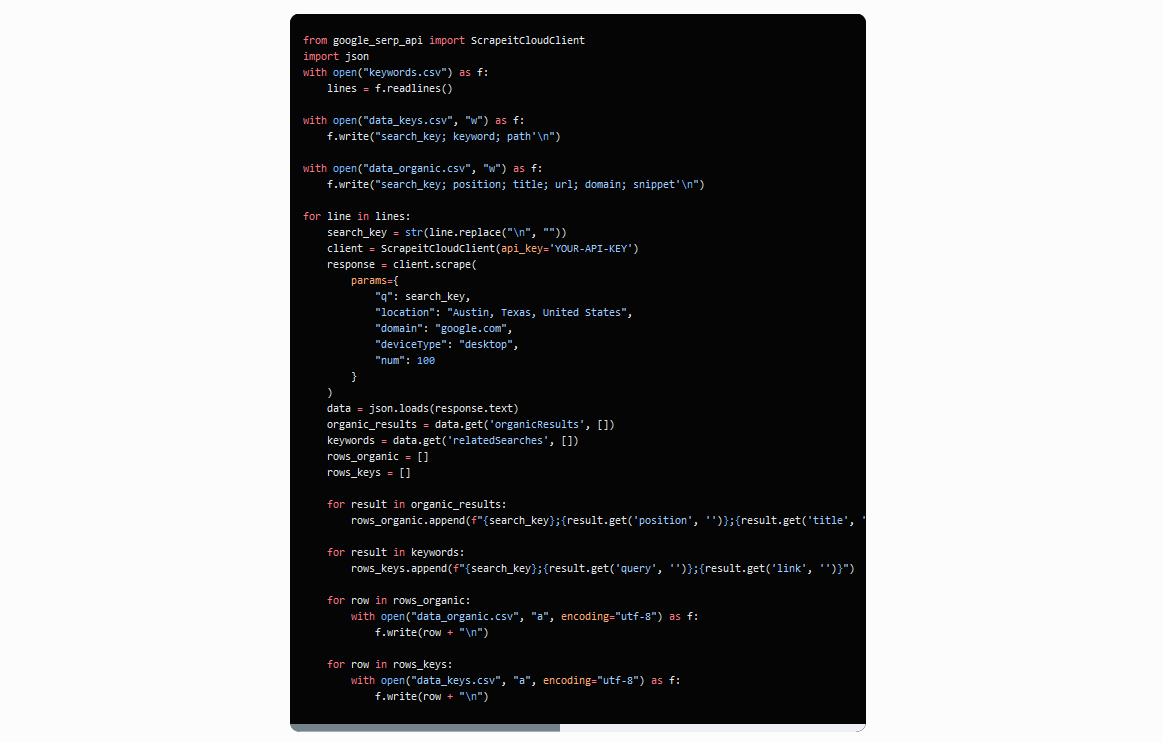
Hãy lưu data từ “organicResults” và “relatedSearches” tới các files riêng rẽ. Trước tiên, định dạng trả lời được
nhận từ string thành JSON và đặt data từ các thuộc tính mong muốn vào các biến:
data = json.loads(response.text)
organic_results = data[‘organicResults’]
keywords = data[‘relatedSearches’]
Tạo các biến với kết quả mong muốn.
rows_organic = []
rows_keys =[]
Đi qua tất cả các ngõ ngách từng phần tử một và đặt chúng vào các biến trong dạng đúng:
for result in organic_results:
rows_organic.append(str(result[‘position’])+”;”+str(result[‘title’])+”;”+str(result[‘link’])+”;”+str(result[‘source’])+”;”+str(result[‘snippet’]))
for result in keywords:
rows_keys.append(str(result[‘query’])+”;”+str(result[‘link’]))
Hãy lưu data vào các files:

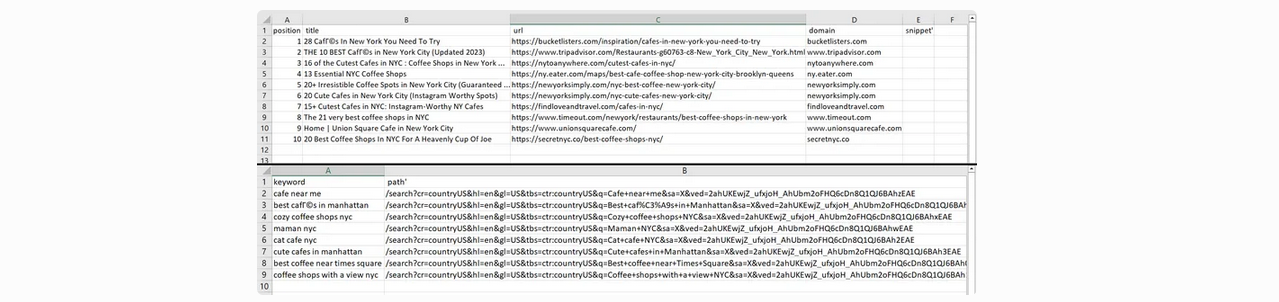
Kết quả của việc chạy script, chúng ta nhận 2 files:
Chúng ta có thể thấy số lần kết quả bằng cách thay đổi tham số num_results trong params. Tuy nhiên, hãy giả sử
chúng ta có một file cái lưu giữ tất cả từ khóa chúng ta cần để scrape dữ liệu. Chúng ta cần mở file trước tiên
và sau đó đi qua nó từng dòng một sử dụng một keyword mới:

Chúng ta đã chỉ ra column headers cho các files mới trước khi keyword truyền. Cái này có nghĩa file không bị ghi
đè khi bạn tìm kiếm một từ khóa mới. Thay vì cái này, file tăng thêm với nhiều dữ liệu hơn. Chúng ta cũng đã thêm
column khác cái chứa truy vấn tìm kiếm text tới nó các kết quả khớp.
Bây giờ hãy thay đổi trả lời và chỉ ra keyword cái sẽ tương tự như dòng biến:
response = client.scrape(
params={
“q”: search_key,
“location”: “Austin, Texas, United States”,
“domain”: “google.com”,
“deviceType”: “desktop”,
“num”: 100}
)
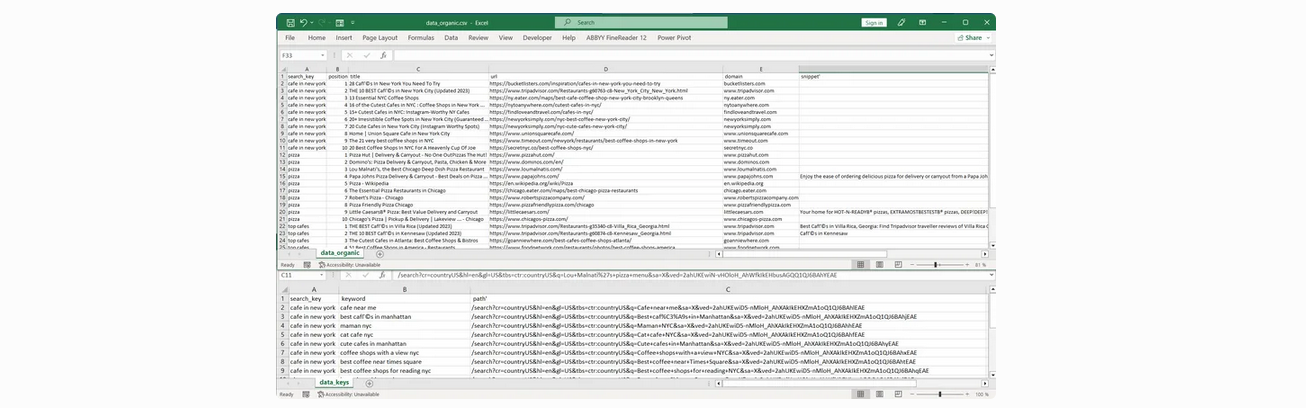
Phần còn lại của code sẽ tương tự. Chỉ khi một column mới sẽ được thêm với dòng biến. Kết quả là, chúng ta nhận hai files
sau:
Code Python đầy đủ:
Lợi ích ban đầu sử dụng thư viện HasData có nghĩa bạn không cần nghĩ về xoay proxy, duyệt Javascript hay giải quyết
captcha – API cung cấp dữ liệu được chuẩn bị.